Thursday, May 5, 2011

Oatmeal Everything Bars

These are supposed to be oatmeal cranberry bars, but naturally I did not realize until I had started throwing together all my ingredients that we did not have enough dried cranberries for this recipe. Fortunately, we had a bag of "mixed dried fruit" pieces which worked just as well. There were different types of raisins, dates, mango etc and I thought it made these bars a lot more exciting than just cranberries. Oh, and since I love walnuts so much I through some of those in as well... The more the merrier right?

Sometimes I find myself wanted a good snack but I try to stay away from cookies as much as possible. The only thing to do in this case is make your own snack bars or granola bars. This recipe is almost cookie like in flavor as well as texture. These are fairly sweet thanks to the coconut and brown sugar, but a lot more crumbly than a store bought granola bar. There is really nothing sticky holding it all together, just a little bit of butter and an egg. I might suggest cooking it for a shorter time so that it does not dry out the bars so much. Other than being a pain to cut and move I have nothing bad to say about these! With the brown sugar, flour, butter etc, they aren't much healthier than cookies but you can pretend ;)

This is apparently going to be a short, lazy post but look for more granola bar recipes to come! After all, there are only so many different kinds of cookies I can bake this summer.

Wednesday, May 4, 2011

Brown Sugar Pound Cupcakes with Irish Cream Frosting

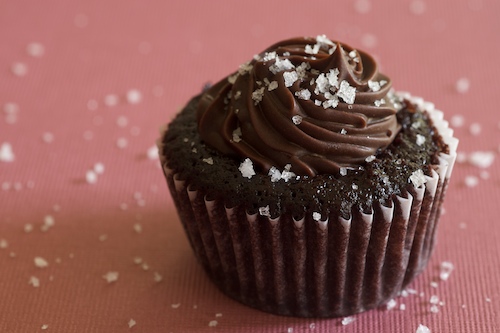
These cupcakes I made for Easter Sunday. While I fully recognize it's importance as a religious holiday, I also view it as another opportunity to pull out the KitchenAid Mixer, aka my best friend in the whole wide world. Now for this particular holiday I decided on Brown Sugar Pound Cakes and used some Irish Cream leftover in the refrigerator to make the buttercream. Of course I dyed it pastel green for good measure... I wanted them to look festive!

So here's the problem with pound cake - I was spoiled for 18 long years and was treated to the best pound cake in world. Now nothing (I mean nothing! Not even one of my own creations!) can possibly compare to the cakes my grandmother used to make. I remember every time we arrived at their farm house (they literally lived on a farm) I would run into the kitchen following the scent of sugar and butter baking in the oven. On the rare occasion my nose did not pick up this wonderful scent, I headed instead for dining and checked under the lid on the cake plate. And 9 times out of 10.... VOILA! There was a perfectly moist and delicious pound cake.

Hmm. We'll since I have been eloquently waxing on about this cake you might wonder why I did not recreate it for an Easter treat instead of using a Martha Stewart impostor recipe. There are two reasons. The first is that I am thoroughly convinced that even if I attempted to make a pound cake with the exact recipe my grandmother wrote years ago, it would still not even come close. The other reason is... I just plain didn't think about it. I want to make cupcakes and flipping through my Martha Stewart cupcake book I found this recipe and it seemed to be the easiest one in the book. So naturally I jumped into action and set the oven to "BAKE".

The original recipe calls for brown butter glaze which I am sure is delicious but I really wanted to use some Irish Cream. Which I did. Technically, these cupcakes I made are Martha's idea of St. Patrick's day cupcakes but I obviously missed that holiday. They're green and everything! I didn't even think of that. Oops. Anyway, without further ado, here is the recipe. Nothing spectacular I assure you, but fairly good as fair as cupcake pound cakes go (not that I have anything to compare them too...). The frosting makes them in this case, I think.

Brown Sugar Pound Cupcakes Yield: 28

3 cups sifted all-purpose flour
2 teaspoons baking powder
1/2 teaspoon salt
2 sticks butter, room temp
2 1/4 cups packed brown sugar
4 large eggs, room temp
3/4 cup buttermilk (I never seem to have buttermilk and if you don't either just use 2 tablespoons of lemon juice and add whatever milk you have to that until you have 3/4 cups of weird lemon-y milk instead!)

1. Preheat oven to 325. Line muffin tins or prepare them with a nonstick cooking spray. Combine dry ingredients in a large bowl.
2. Cream butter and sugar until light and fluffy. Add eggs, 1 at a time, beating after each addition.
3. Add dry ingredients to butter mixture in 3 additions, alternating with additions of buttermilk. Fill each tin until 3/4 full.
4. Bake cupcakes roughly 20 minutes.While they cool... prepare the Irish cream frosting!!

Irish Cream Buttercream 
4 cups confections sugar
1 stick butter,  room temp
3 to 4 tablespoons Baileys (we never have Baileys... it's another brand but obviously works just as well. Also, I'm pretty sure I used more than 3 or 4 tablespoons... hmmm.)

1. Whip the butter until it is light and fluffy and add the confectioners sugar a little bit at a time. 2. When the frosting looks thick slowly add in the Irish Cream and whip until combined. If this has made the frosting too thin you can easily mix in more powdered sugar.


Saturday, April 2, 2011

Cookies and the Cure for Rainy Day Blues

This past Wednesday was miserable. Not only was it a bad day, the weather decided to suck as well. High in the 40's and pouring rain all day... Not ideal for the end of March, let alone the day I chose to ride the bus back to Durham to see one of my best friends home on her spring break.

Because the weather was so dreary, I decided to cheer myself with a visit to the Campus Farmer's Market and the Cookie People. They make the biggest, chewiest cookies and I always like to get their 4 for $5 deal. My favorite so far is still the oatmeal raisin but the mexican hot chocolate cookie is a close second. And of course I still need to try the triple chocolate! Yum that looks incredible. But so does this right? It's a close up of my oatmeal raisin cookie that I took while sitting at the bus stop freezing to death.

I also took this opportunity to practice my photography skills because I was outside in natural light and even though it was overcast I think it actually worked out pretty well. On top is the peanut butter chocolate cookie with a Reese's Cup baked in to center. The middle is a Snickerdoodle and on the bottom of the stack is a Rootbeer Float cookie. I know it sounds strange and that is exactly why I bought it. It is surprisingly sweet and very similar to a soft ginger snap but the glaze packs a punch with the rootbeer flavor. Needless to say, my day went a lot better after this purchase. Even rain can't bring you down when you have homemade cookies to cheer you up and a mocha to warm your tummy!

Tuesday, March 29, 2011

The Frustrations of Food Blogging

Okay, really? I sat in an extremely boring studio review session today (for my design courses we don't have tests, we have projects. We don't get number grades, we get critiques. It's not nearly as fun as it sounds sometimes) and spent most of the time looking over my friends shoulder at some of the most delicious looking food imaginable on her MacBook Pro. What wonderful website was she looking at, you may ask? This magnificence right here.

IMG_1430
This beauty is from Joy the Baker... She's good.

Now I look at these photos that make my mouth water and think, why can't I do that? I've read tons of articles about how to take great food photos and I've tried every possibility as far as lighting goes in my downstairs. I've tried arranging my concoctions on plates, napkins, and cake stands. I've taken literally hundreds of up close shots, photos looking down on the food, at eye level, zoomed out, everything! I can't get a decent photo to save my life. Everything on my photo looks amateurish and undelicious and not only am I peeved my apparent inability to take a half decent photo, I am upset that I cannot do justice to the treats I am baking.


If only I could... I mean I can make it, sure... but photograph? I don't think so. I mean seriously, WHAT is that background? This scrumptious picture is from a blog I actually just happened upon the other day called A Baked Creation.

I typically try to blame my camera. That actually worked pretty well until I used my mom's super duper big fancy digital number and had the same issues. SUCH a problem. There goes my red herring. Hmm. I know I can't blame the food itself because in reality it truly does look incredible. On film? Not so much. (I just realized that no one really uses film anymore so that no longer applies. It's such a shame though really because I love slides and printed photographs. This digital age thing kills me sometimes...)

Jeez I mean have you SEEN this stuff? I just can't stop scrolling through the pages it all looks so good. Sigh.

So! Solutions? I have none... First, I will read more food blogs and learn their secrets. Then, I will scope out better lit areas in my house. THEN if that fails I will set up a place outside where I can take the photographs with the help of natural light. THEN I will attempt to learn the ways of photoshop... Which I should probably already know considering as how I am a design student an all.

Chocolate Salted-Caramel Mini Cupcakes
Mine could look this good too! But how? (Rubs chin in very Grinch-like manner...)

Hmm. This post is really just me venting my frustrations but it will also serve as a record of my resolution to experiment with photography and try new things when documenting my creations. They deserve it. And so do you! (But... in case I fail miserably, there are billions of other food blogs that take awesome photos that I can recommend hahaa. Oh boy. Here we go! Wish me luck.)

Monday, March 28, 2011

The Easiest, Tastiest Chocolate Chip Cookie You'll Ever Make...

The title is no joke. This recipe is on the very first page of the Nestle Tollhouse cookbook we have in our (somewhat large) collection. In fact, this recipe is so easy a caveman could do it.
Every time I bake these cookies I like to stray just a bit from the recipe and create my own little concoction. Typically this just means dumping in some oatmeal with mini chocolate chips or something equally uninspired like that.

This time around I was baking these for my best friend Katie so I held back from going too far with a new experiment. This time I simply swapped out my oatmeal for the addition of chocolate chips, butterscotch chips, white chocolate chips and walnuts. I went to see her this past weekend and I wanted to take something delicious to snack on. However, I had a very limited amount of time in which to bake before I had to hit the road so I prepared all the ingredients the week before when I was home. It was so easy I wish I could bake like that all the time… Combining ingredients in plastic bags and just throwing them all in a bowl when you get an urge for something sweet.

So! As soon as I got back to my house I turned on the oven and proceeded to soften the butter and add all the ingredients from their respective baggies that I had them stored in. There is nothing special about this recipe. It uses very typical ingredients to create a cookie that is absolutely melt-in-your-mouth amazing. My mom told me this particular cookie was a little too sweet (but in all fairness she said this after eating THREE). I tend to agree with her on this one though and I blame the white chocolate chips. I love white chocolate but for some reason white chocolate chips just do not taste very good. If it’s white chocolate it better be Lindt, that’s all I have to say.

The point is, this is a very basic chocolate chip cookie recipe and can be played around with in many ways. Aside from adding or subtracting chocolate chips or something else, adding cinnamon or nutmeg (or both) can be really good (been there, done that). I am kind of curious how these would turn out if I changed the type of extract I use. Hmmm… next time!

Nestle’s Chocolate Chip Cookies Yield: 5 Dozen

2 ¼ cups all-purpose flour
1 teaspoon baking soda
1 teaspoon salt
1 cup butter, softened
¾ cup brown sugar
¾ cup granulated sugar
1 teaspoon vanilla extract
2 eggs
2 cups chocolate chips (Naturally the Nestle version says you should use Nestle chocolate chips but of course it doesn’t matter!)
1 cup chopped nuts (I use walnuts, my favorite. But again, using something else like peanuts might be just as good in this recipe.)

1. Preheat oven to 375 degrees. Combine flour, baking soda and salt. 
2. Beat butter and both sugars until creamy. Add vanilla and eggs one at a time. Beat well after each addition. Gradually mix in flour mixture. Stir in morsels and nuts just until combined. 
3. Drop by rounded tablespoon onto prepared baking sheets.
4. Bake 9 to 11 minutes or until golden brown. Cool for 2 minutes then remove to wire racks to finish cooling.

It doesn't get any easier than that folks.


Everything ready to go and waiting to made into something delicious!
Nothing I love more than this step. Stirring all the amazing chocolates and nuts into the dough.
The final product. I think they are pretty photogenic, myself.

Friday, March 25, 2011

Reese's Peanut Butter Cupcupcupcakes!

This past Monday was the 20th birthday of one of the coolest people at my school! I asked her what kind of cupcakes she wanted and the word I got was "CHOCOLATE". Okay that's the best answer in the world (obviously), but chocolate chocolate cupcakes? There are much worse things but for a baker like me that is just too boring.

There is a simple solution to this that I found out last fall when making these Almond Joy cupcakes - find out the persons favorite chocolate bar and make them a cupcake based on the candy. In this case, I asked my friend how she felt about Reese's Cups and lucky for me... She loves them. The plan was simple... Drop a Reese's Peanut Butter Cup into the top of every cupcakes before baking them and they will sink down into the cake as it is cooking. Then make a peanut butter buttercream for the frosting and... VOILA! A delectable peanut-buttery-chocolatey treat.

The chocolate cupcake part is simple. Martha Stewart has a recipe for "One Bowl" cupcakes that don't even need butter. I made these last fall as well and the recipe can be found here. The only difference is that each of these cupcakes will have a peanut butter cup dropped into them before they go in the oven.

The peanut butter frosting was just a simple and sooo delicious. Once again, I looked up a very simple recipe for this as well. (Okay, fine... This is from Martha Stewart too but what can I say? The woman is a culinary genius apparently.)

The only thing I had left to do was transport them back to school... On a bus. To solve this dilemma I went to AC Moore and bought two different sized cake boxes. I ended up (barely) fitting 15 frosted cupcakes into a 10"x10" box and tying a pretty yellow ribbon around it. Anyway, it looked awesome. And now the moment you've all been waiting for... the reveal of the cupcakes themselves!

Yummyyumyum. Okay so the candles were unnecessary... but so pretty! You can't have a birthday without candles anyway. Everyone knows that.
All lined up and ready to get on the bus!

Wednesday, March 16, 2011

Coconut Macaroons: Take 1

This post should honestly be entitled: "A MOST Epic Fail"... because that is what it is. This is one of the most disgusting things I've ever baked. I think it is only surpassed by the peach cobbler I made in middle school with old peaches and baking soda instead of baking powder. At that point in my life, my feelings were so delicate that my mother insisted on eating two servings. I cried the whole time because I knew it tasted like s#!* and she ate the whole thing anyway. I could barely swallow two mouthfuls.


Now, if you are a big (huge) fan of coconut like me you might be wondering... What could possibly have gone so wrong? The answer: I have absolutely no idea. The honey was melting out everywhere and if I kept baking them it would have oozed over the edges of the pan and starting burning the oven. I couldn't keep them in the oven even without the possibility of everything burning and smelling horrible because they had already been in far longer than they should have been.


My mom thinks if the kept cookie they would have been fine. I disagree. When I tried one it was sickly sweet coconut/honey/salt combination that made me gag. I will include pictures, the recipe and a warning. Maybe other will do better with this recipe than I have but I'm not risking it again. I am going to find another coconut macaroon recipe and try again because I simply love coconut. 


Coconut Macaroons Yield: 22


3 cups shredded coconut (I used sweetened shredded... possibly mistake number one)
1 teaspoon almond extract
1/8 teaspoon salt
2/3 cup honey
4 egg whites
1 teaspoon cream of tartar


1. Preheat oven to 350. Combine coconut, extract, and salt. Stir in honey until combined.
2. Beat egg whites until stiff peaks form using an electric mixer. Fold into coconut mixture along with cream of tarter.
3. Scoop the mix into cookie scoop and press onto a greased cookie sheet creating compact balls.
4. Bake for 10 – 15 minutes, or until golden brown. Cool on sheet.

Gross.


honey melting EVERYWHERE
so unappealing...


Okay, do not be deceived. I know they may look like tasty balls of coconutty goodness, but they're not. They just are not.

And I clearly need to work on my photo taking skills. Sigh.